Add Power Button to the Right-Click Context Menu in Windows

Add Power Button to the Right-Click Context Menu in Windows

Power_Menu_Shortcut_Desktop_Context_Menu_Windows.png

If you want to restart or turn off your computer only with 2 clicks you can do it by using this simple registry code tweak that works both on windows 7 and 8 and 10.

1-Copy and paste following into Notepad and save as “name” .reg
(or you can download Power Options registry file and extract the downloaded file to your desktop.)


 Quote
Windows Registry Editor Version 5.00
;Created by Vishal Gupta for AskVG.com
;Thanks to AskVG reader leomate for sharing Hybrid Shutdown shortcut
[HKEY_CLASSES_ROOT\DesktopBackground\Shell\Power Menu]
"MUIVerb"="Power Menu"
"SubCommands"="lock;logoff;switch;sleep;hibernate;restart;shutdown;hybridshutdown"
"Icon"="shell32.dll,215"
"Position"="bottom"
[HKEY_LOCAL_MACHINE\SOFTWARE\Microsoft\Windows\CurrentVersion\Explorer\CommandStore\shell\lock]
@="Lock"
[HKEY_LOCAL_MACHINE\SOFTWARE\Microsoft\Windows\CurrentVersion\Explorer\CommandStore\shell\lock\command]
@="Rundll32 User32.dll,LockWorkStation"
[HKEY_LOCAL_MACHINE\SOFTWARE\Microsoft\Windows\CurrentVersion\Explorer\CommandStore\shell\logoff]
@="Log Off"
[HKEY_LOCAL_MACHINE\SOFTWARE\Microsoft\Windows\CurrentVersion\Explorer\CommandStore\shell\logoff\command]
@="Shutdown -l"
[HKEY_LOCAL_MACHINE\SOFTWARE\Microsoft\Windows\CurrentVersion\Explorer\CommandStore\shell\switch]
@="Switch User"
[HKEY_LOCAL_MACHINE\SOFTWARE\Microsoft\Windows\CurrentVersion\Explorer\CommandStore\shell\switch\command]
@="tsdiscon.exe"
[HKEY_LOCAL_MACHINE\SOFTWARE\Microsoft\Windows\CurrentVersion\Explorer\CommandStore\shell\sleep]
@="Sleep"
[HKEY_LOCAL_MACHINE\SOFTWARE\Microsoft\Windows\CurrentVersion\Explorer\CommandStore\shell\sleep\command]
@="rundll32.exe powrprof.dll,SetSuspendState Sleep"
[HKEY_LOCAL_MACHINE\SOFTWARE\Microsoft\Windows\CurrentVersion\Explorer\CommandStore\shell\hibernate]
@="Hibernate"
[HKEY_LOCAL_MACHINE\SOFTWARE\Microsoft\Windows\CurrentVersion\Explorer\CommandStore\shell\hibernate\command]
@="Shutdown -h"
[HKEY_LOCAL_MACHINE\SOFTWARE\Microsoft\Windows\CurrentVersion\Explorer\CommandStore\shell\restart]
@="Restart"
[HKEY_LOCAL_MACHINE\SOFTWARE\Microsoft\Windows\CurrentVersion\Explorer\CommandStore\shell\restart\command]
@="Shutdown -r -f -t 00"
[HKEY_LOCAL_MACHINE\SOFTWARE\Microsoft\Windows\CurrentVersion\Explorer\CommandStore\shell\shutdown]
@="Shut Down"
[HKEY_LOCAL_MACHINE\SOFTWARE\Microsoft\Windows\CurrentVersion\Explorer\CommandStore\shell\shutdown\command]
@="Shutdown -s -f -t 00"
[HKEY_LOCAL_MACHINE\SOFTWARE\Microsoft\Windows\CurrentVersion\Explorer\CommandStore\shell\hybridshutdown]
@="Shut Down (Hybrid)"
[HKEY_LOCAL_MACHINE\SOFTWARE\Microsoft\Windows\CurrentVersion\Explorer\CommandStore\shell\hybridshutdown\command]
@="Shutdown -s -f -t 00 -hybrid"

2. To add the power options double click on the file Add Power Menu.reg on the registry Editor Windows click Yes to the warning.
Add Power Menu 1

3. Now click Ok when it says that the power menu is installed successfully.

Add Power Menu 2
4. Now right click on an empty space at your desktop and click on Power Menu to open the power options.
Add Power Menu 3


NOTE: To remove power menu repeat the same process but instead click on Remove Power Menu from the downloaded file.

How to enable remote desktop

How to Set Up and Use Remote Desktop for Windows 10
Enable Remote Desktop for Windows 10 Pro
The RDP feature is disabled by default, and to turn the remote feature on, type: remote settingsinto the Cortana search box and select Allow remote access to your computer from the results at the top.

1 search
System Properties will open to the Remote tab. From there select Allow remote connections to this computer and keep the box checked for Network Level Authentication for better security. Also, note that you will need to enable incoming remote connections on the PC you’re connecting.

 2 Allow remote connections


Convert a Windows Server with GUI to Server Core

Converting a Windows Server with GUI to Server Core and vice versa

Windows Server 2012 comes with a couple of new features that can be used to make your life as a System Administrator much better. One of these cool features is the ability to convert a server with full installation into a core edition and vice versa. You can perform this action because each full installation is composed of two items:
• Graphical Management Tools and Infrastructure (Server-Gui-Mgmt-Infra) – this component provides that MMC (Microsoft Management Console) and Server Manager Console.
• Server Graphical Shell (Server-Gui-Shell) – provides the rest of the full installation experience such as Windows Explorer.
In the Add Roles and Features Wizard, you can view these two features by navigating to User Interface and Infrastructure feature:
Add Roles and Features Server GUI

To convert a Full Installation to a Core Edition, you’ll have to remove these two features. To achieve this result simply select Remove Roles and Features from Server Manger console, navigate to the features tab and uncheck these two. Note that the Server Graphical Shell is dependent on the Graphical Management Tools and Infrastructure feature so uninstalling this one will also remove the other and also Windows Powershell ISE:
Remove Roles Features Server Manager
You can achieve similar results by using Windows Powershell. To view available commands with the Server Manager module, type the following command: Get-Command -Module ServerManager:

Powershell Server Manager Module


To remove the features you’ll have to provide the Powershell names. You can view them by using the Get-WindowsFeature cmdlet:
Powershell Server Manager Module
Now simply execute Remove-WindowsFeature Server-Gui-Mgmt-Infra –restart command and wait for the uninstall process to finish.
Remove Windows Feature Server GUI Management Infrastructure
Once the server restarts, you will be presented to the Server Core Interface which only includes Command Prompt (you can also start a Powershell console).
Windows Server 2012 offers the possibility of installing only the Graphical Management Tools and Infrastructure feature on top of the Server Core. This feature  allows an Sysadmin to useServer Manager ConsoleMMC and a portion of Control Panel within the Server Core Edition. This configuration type is also known as Minimal Server Interface. Now proceed with the installation by executing Install-WindowsFeature Server-Gui-Mgmt-Infra command. Note that I’ve first started Powershell from Command Prompt:
 Minimal Server Interface
Once the process is completed, type Restart-Computer to reboot the machine. The Minimal Server Interface will automatically open Server Manager Console:
Minimal Server Interface Server Manager Console

Note that you may choose to remove the Graphical Management Tools and Infrastructure feature from a full installation of Windows Server 2012. In this case, Windows ExplorerIEStart screenand the Desktop will be removed from your machine.
To revert a Minimal Server installation to a full version, use the Install-WindowsFeature Server-Gui-Shell command within Windows Powershell:
Revert Minimal Server Installation
Windows Server Core installations offers a couple of benefits to your servers by providing a limited attack surface and a better server performance because only the necessary services are installed and the server does not have to handle extra load. The overall server performance is increased with a Server Core edition. Disadvantages of using this edition are the fact that it requires some extra technical knowledge because the server can only be administrated by using commands and also note that the core edition supports a limited number of roles that can be installed. How you install and configure servers depends on the network requirements and the purpose of the machines. Being able to switch between the full installation and the core edition offers a huge aid in terms of flexibility because you can perform this action easily on the same server without having to install and configure a fresh machine.


How to install Active Directory on win server 2012

Windows Server 2012: Set Up your first Domain Controller (step-by-step)


Using Server Manager (UI):
In order to make the windows server 2012 domain controller we will install ADDS (Active Directory Domain Services) role from the server manager on Windows Server 2012.
First we will change the server name let say server1 (you can try another one) and the IP address 10.10.21.1 (try to avoid using default 192.168.0.1)
  
Installing the AD DS role
 
“Before You Begin” screen provides you basic information such as configuring strong passwords, IP addresses and Windows updates.

On Installation Type page, select the first option “Role-based or Feature-based Installation“.
Scenario-based Installation option applied only to Remote Desktop services.

On the “Server Selection” Page, select a server from the server pool and click next.

To install AD DS, select Active Directory Domain Services in turn it will pop-up to add other AD DS related tools. Click on Add Features.

After clicking “Add Features” above, you will be able to click “Next >” as shown in the screen below.

On the “Select Features” Page, Group Policy Management feature automatically installed during the promotion. Click next.

 
On the “Active Directory Domain Services” page, it gives basic information about AD DS. Click Next.

On the “Confirmation” Page, You need to confirm this to continue with this configuration. It will provide you an option to export the configuration settings and also if you want the server to be restarted automatically as required.
 After clicking “Install” the selected role binaries will be installed on the server.
 After “Active Directory Domain Services” role binaries have been installed and now it is time to promote the server to a Domain Controller.
  
Promoting Windows 2012 Server to Domain Controller
To create a new AD forest called “Test.local”, select add a new forest.
 - Select Add a new forest,Type the name Test.local and click next.

Specify the FFL, DFL, whether or not it should be a DNS Server and also the DSRM administrator password.

As you can see, it has selected the GC option by default and you cannot deselect it.

The reason for this is that is the very first DC of the AD forest and at least one needs to be a GC.
-        - DNS delegation warning.

-       -  Checks the NetBIOS name already assigned.

-        Specify the location of the AD related folders and then click next.
-        - Summary Of All Installation Options/Selections will be display
- Before the actual install of AD, all prerequisites are checked. If All prerequisite checks are passed successfully then clickInstall.
When you click Install, DNS and the GPMC are installed automatically.

After the promotion of the server to a DC finished server restart automatically.
Once the server is booted and you logon to it, click on Server Manager | Tools , will notice that following have been installed:
  • Active Directory Administrative Center
  • Active Directory Domains and Trusts
  • Active Directory Module for Windows PowerShell
  • Active Directory Sites and Services
  • Active Directory Users and Computers
  • ADSI Edit
  • DNS
  • Group Policy Management


Join to the Domain

  • Join the Computer to the Domain
Important
To join a computer to a domain, you must be logged on to the computer with the local Administrator account or, if you are logged on to the computer with a user account that does not have local computer administrative credentials, you must provide the credentials for the local Administrator account during the process of joining the computer to the domain. In addition, you must have a user account in the domain to which you want to join the computer. During the process of joining the computer to the domain, you will be prompted for your domain account credentials (user name and password).


Windows Server 2008 and 2012,windows vista,7,8,10

Membership in Domain Users, or equivalent, is the minimum required to perform this procedure.
To join computers to the domain
  1. Log on to the computer with the local Administrator account.
  2. Click Start, right-click Computer, and then click Properties. The System dialog box opens.
  3. In Computer name, domain, and workgroup settings, click Change settings. The System Properties dialog box opens.
Note
On computers running Windows Vista and above, before the System Properties dialog box opens, the User Account Control dialog box opens, requesting permission to continue. Click Continue to proceed.
  1. Click Change. The Computer Name/Domain Changes dialog box opens.
  2. In Computer Name, in Member of, select Domain, and then type the name of the domain you want to join. For example, if the domain name is example.com, type example.com.
  3. Click OK. The Windows Security dialog box opens.
  4. In Computer Name/Domain Changes, in User name, type the user name, and in Password, type the password, and then click OK. The Computer Name/Domain Changes dialog box opens, welcoming you to the domain. Click OK.
  5. The Computer Name/Domain Changes dialog box displays a message indicating that you must restart the computer to apply the changes. Click OK.
  6. On the System Properties dialog box, on the Computer Name tab, click Close. The Microsoft Windows dialog box opens, and displays a message, again indicating that you must restart the computer to apply the changes. Click Restart Now.
Windows Server 2003 and Windows XP

Membership in Domain Users, or equivalent, is the minimum required to perform this procedure.
To join computers running Windows Server 2003 and Windows XP to the domain
  1. Click Start, right-click My Computer, and then click Properties. The System Properties dialog box opens.
  2. Click Change. The Computer Name Changes dialog box opens.
  3. In Computer Name Changes, in Member of, select Domain, and then type the name of the domain you want to join. For example, if the domain name is example.com, type example.com.
  4. Click OK. The Computer Name Changes dialog box opens. In User name, type the domain administrator account name, and in Password, type the administrator password, and then click OK.
  5. The Computer Name Changes dialog box opens, welcoming you to the domain.
  6. Click OK. The Computer Name Changes dialog box displays a message indicating that you must restart the computer to apply the changes.
  7. Click OK.
  8. On the System Properties dialog box, on the Computer Name tab, click OK, to close the System Properties dialog box. The System Settings Change dialog box opens, and displays a message, again indicating that you must restart the computer to apply the changes.
  9. Click Yes.


Install Hyper-V

Install Hyper-V and create a virtual machine

Applies To : Windows 8, Windows 8.1, Windows Server 2012, Windows Server 2012 R2
Learn how to get started with Hyper-V on Windows Server 2012, Windows Server 2012 R2, Windows 8, or Windows 8.1 Professional and Enterprise editions.
In this document:
  • Prerequisites
  • Step 1: Install Hyper-V
  • Step 2: Create a virtual machine
  • Step 3: Install the guest operating system
  • Step 4: Install or upgrade integration services
Prerequisites
Before you install Hyper-V, make sure that you have the following:
  • A user account with administrator permissions for the computer.
  • Enough memory to run all the virtual machines that you plan to run at the same time.
  • Software to install as the guest operating system for the virtual machine.
Step 1: Install Hyper-V
Install Hyper-V so you can create and run virtual machines on this computer.
  • To install the Hyper-V role in Windows Server 2012 or Windows Server 2012 R2
  • To enable Client Hyper-V on Windows 8 or Windows 8.1
To install the Hyper-V role in Windows Server 2012 or Windows Server 2012 R2
You can install the Hyper-V role in Server Manager or by using Windows PowerShell.
Install the Hyper-V role by using Server Manager
  1. In Server Manager, on the Manage menu, click Add Roles and Features.
  2. On the Before you begin page, verify that your destination server and network environment are prepared for the role and feature you want to install. Click Next.
  3. On the Select installation type page, select Role-based or feature-based installation and then click Next.
  4. On the Select destination server page, select a server from the server pool and then click Next.
  5. On the Select server roles page, select Hyper-V.
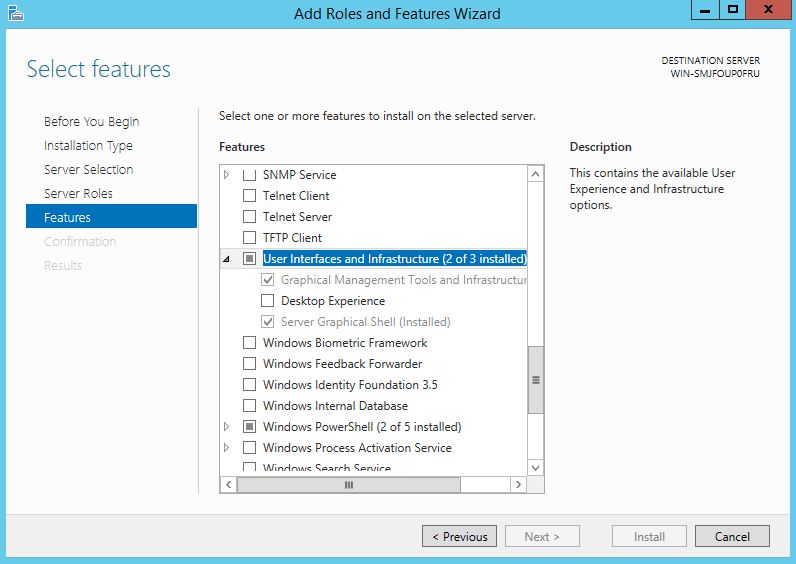
  6. To add the tools that you use to create and manage virtual machines, click Add Features. On the Features page, click Next.
  7. On the Create Virtual Switches page, Virtual Machine Migration page, and Default Stores page, select the appropriate options.
  8. On the Confirm installation selections page, select Restart the destination server automatically if required, and then click Install.
  9. When installation is finished, verify that Hyper-V installed correctly. Open the All Servers page in Server Manager, select a server on which you installed Hyper-V. Check the Roles and Features tile on the page for the selected server.
Install the Hyper-V role by using PowerShell
  1. Open Windows PowerShell session with elevated user rights. To do this, click the Windows Start button and type PowerShell. Right-clicPowerShell and click Run as Administrator.
  2. Run the following command where computer_name represents a remote computer on which you want to install Hyper-V. To install Hyper-V directly from a console session, do not include -ComputerName <computer_name> in the command.
3.  Install-WindowsFeature –Name Hyper-V -ComputerName <computer_name> -IncludeManagementTools -Restart 
4.   
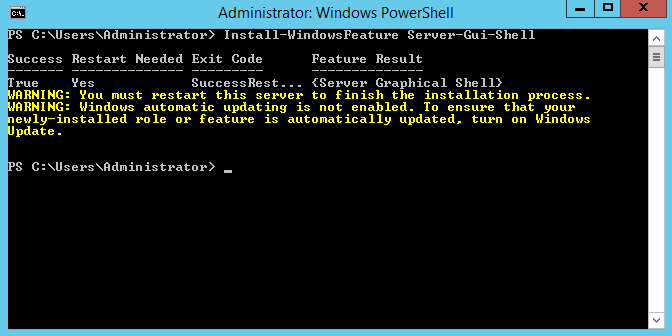
  1. When the installation is finished, run the Get-WindowsFeature to verify that everything installed correctly. If you installed Hyper-V remotely, include the ComputerName parameter (Get-WindowsFeature -ComputerName <computer_name>) to view a list of roles and features installed on the server.
In Windows PowerShell, unlike in the Add Roles and Features Wizard, management tools and snap-ins for a role are not included by default. To include management tools as part of a role installation, add the -IncludeManagementTools parameter to the cmdlet. Management tools and snap-ins can't be installed on servers that runs the Server Core installation option of Windows Server. If you try to install the management tools for the Hyper-V role on a server that runs the Server Core installation option of Windows Server 2012, you are prompted to change the installation option to one that allows the management tools to run.
To enable Client Hyper-V on Windows 8 or Windows 8.1
You can enable the Hyper-V role in Program and Features or by using Windows PowerShell.
Enable the Hyper-V role by using Program and Features
  1. In the Control Panel, click Programs >Programs and Features.
  2. Click Turn Windows features on or off.
  3. Click Hyper-V, click OK, and then click Close.
Hyper-V is an optional feature so the files required for installation may or may not be present on your computer, depending on your organization’s IT policy. If you are connected to the Internet and you enable the feature, the required files will automatically download. If you are not connected to the Internet, you can download the required files and manually copy them to your computer. Otherwise you must provide the installation media.
Enable the Hyper-V role by using PowerShell
  1. Open Windows PowerShell session with elevated user rights. To do this, click the Windows Start button and type PowerShell. Right-click PowerShell and click Run as Administrator.
  2. Run the following command.
3.  enable-WindowsOptionalFeature -Online -FeatureName Microsoft-Hyper-V -All  
4.   
  1. When the installation is finished, reboot the computer.
Step 2: Create a virtual machine
You can create a virtual machine by using the wizard in Hyper-V Manager or by using Windows PowerShell.
To create a virtual machine in Hyper-V Manager
  1. Open Hyper-V Manager.
  2. From the navigation pane of Hyper-V Manager, select the computer running Hyper-V.
  3. From the Actions pane, click New > Virtual Machine.
  4. Click Next in the New Virtual Machine wizard.
  5. On the Specify Name and Location page, type an appropriate name.
  6. On the Assign Memory page, specify enough memory to start the guest operating system.
  7. On the Configure Networking page, connect the virtual machine to the switch you created when you installed Hyper-V.
  8. On the Connect Virtual Hard Disk and Installation Options pages, choose the option that is appropriate for how you plan to install the guest operating system:
    • If you will install the guest operating system from a DVD or an image file (an .ISO file), choose Create a virtual hard disk. Click Next, and then click the option that describes the type of media you will use. For example, to use an .iso file, click Install an operating system from a boot CD/DVD and then specify the path to the .iso file.
    • If the guest operating system is already installed in a virtual hard disk, choose Use an existing virtual hard disk and click Next. Then, choose Install an operating system later.
  9. On the Summary page, verify your selections and then click Finish.

  Windows PowerShell equivalent commands
You can use the New-VM cmdlet to create a virtual machine in Windows PowerShell. For example, run the following command to create a virtual machine named web server with 1 GB of startup memory and use an existing virtual hard disk in which a guest operating system has already been installed.
New-VM –Name “web server” –MemoryStartupBytes 1GB –VHDPath d:\vhd\BaseImage.vhdx 

Step 3: Install the guest operating system
This step assumes that you configured the boot media for the virtual machine when you created the virtual machine. It can't be automated or done within a Windows PowerShell session.
To install the guest operating system
  1. From Hyper-V Manager, in the Virtual Machines section of the results pane, right-click the name of the virtual machine and click Connect.
  2. From the Action menu in the Virtual Machine Connection window, click Start.
  3. Proceed through the installation.
Step 4: Install or upgrade integration services
Hyper-V includes a software package for supported guest operating systems that improves integration between the physical computer and the virtual machine. This package is referred to as integration services.
This step can't be automated or done within a Windows PowerShell session.
To install integration services
  1. Open Hyper-V Manager. From the Server Manager Tools menu, click Hyper-V Manager.
  2. Connect to the virtual machine. Right-click the name of the virtual machine and click Connect.
  3. From the Action menu of Virtual Machine Connection, click Insert Integration Services Setup Disk. This action loads the setup disk in the virtual DVD drive. Depending on the guest operating system installed, you may need to start the installation manually.
  4. After the installation finishes, all integration services are available for use.